
Securely Running Services with systemd on Linux
My Prometheus Setup as a Template

This blog post has been created by collating and refining my personal setup notes. It's intended to serve as a reliable source of truth for myself and as a practical reference for anyone in the wider community who may need to set up a service on a Linux system using systemd.
While this guide can be used to run any service securely and reliably, in my case, I’ll be referencing Prometheus as the specific example.
GitHub Repo: 001-Securely-Running-Services-SystemD
1. Create a Dedicated System User
First, create a system user solely for running the service. This user won’t have shell access or a home directory. It's purely for running the process, not for logging in interactively.
sudo useradd -M --shell /bin/false prometheus
-Mor--no-create-home: Prevents a home directory from being created.--shell /bin/false: Disables shell login for security.
For a different service, just replace prometheus with the relevant service name.
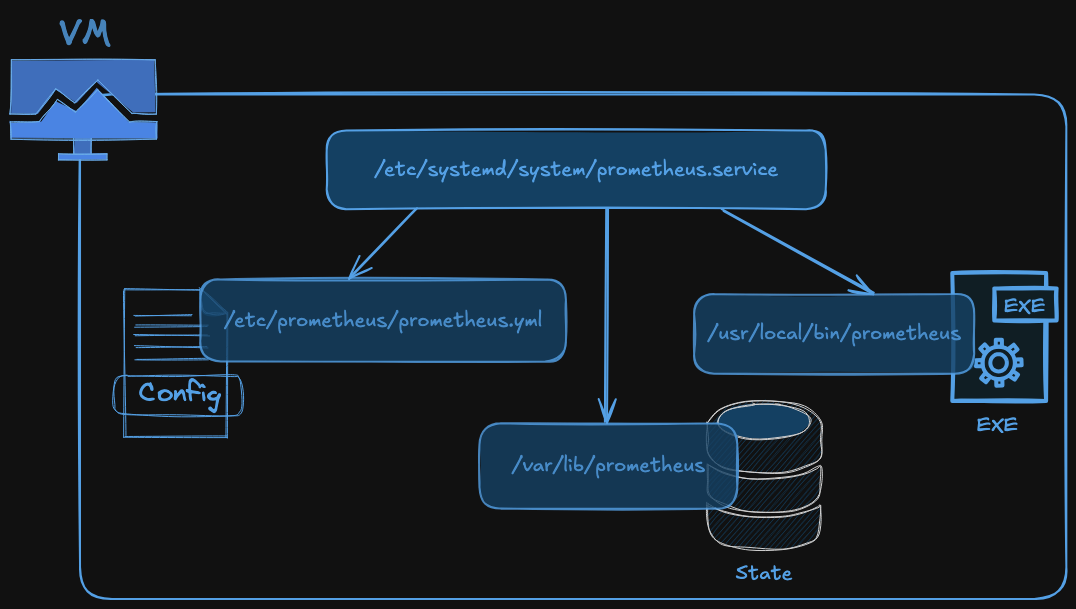
2. Set Up Required Directories
Next, create the configuration and data directories.
sudo mkdir /etc/prometheus
sudo mkdir /var/lib/prometheus
/etc/prometheus: Configuration directory (in line with Linux standards)./var/lib/prometheus: Data directory, which will hold time series data or any service-related persistent storage.
These paths can be adjusted depending on the service you're deploying.
3. Assign Ownership to the Service User
To ensure the service has access to its directories:
sudo chown prometheus:prometheus /etc/prometheus
sudo chown prometheus:prometheus /var/lib/prometheus
This is a good security practice for isolating permissions.
4. Move Executable Files
Now, place the service’s binaries into a system-wide executable location:
sudo cp prometheus promtool /usr/local/binThen assign ownership:
sudo chown prometheus:prometheus /usr/local/bin/prometheus
sudo chown prometheus:prometheus /usr/local/bin/promtool
If you're using a different service, replace the filenames accordingly.
5. Test the Service Manually
Before automating with systemd, test the service with the required configuration:
sudo -u prometheus /usr/local/bin/prometheus \
  --config.file /etc/prometheus/prometheus.yml \
  --storage.tsdb.path /var/lib/prometheus/
Adjust flags as needed for your specific service.
6. Create a systemd Service File
To make your service manageable and boot-persistent, create a unit file:
sudo vi /etc/systemd/system/prometheus.serviceHere’s an example unit file using Prometheus:
[Unit]
Description=Prometheus
Wants=network-online.target
After=network-online.target

[Service]
User=prometheus
Group=prometheus
Type=simple
ExecStart=/usr/local/bin/prometheus --config.file /etc/prometheus/prometheus.yml --storage.tsdb.path /var/lib/prometheus/

[Install]
WantedBy=multi-user.target
Key Concepts:
User/Group: Ensures the service runs under the limited user.
ExecStart: The actual command to start your service.
Wants/After: Delays startup until the network is ready.
WantedBy: Ensures it starts in the correct boot target.
For other services, just adapt the ExecStart, User, and directory paths accordingly.
7. Enable and Start the Service
After saving the file, reload the systemd daemon:
sudo systemctl daemon-reloadStart your service:
sudo systemctl start prometheusCheck its status:
sudo systemctl status prometheusEnable it to start on boot:
sudo systemctl enable prometheusOf course! Here's the same bonus section, refined with UK English spelling to match the rest of your blog:
Bonus: Running the Service with Docker
While systemd offers robust service management for long-running processes on Linux, sometimes it’s more convenient—or preferable—to run a service in a container, particularly in development environments or when working with containerised stacks such as Docker Compose or Kubernetes.
Here’s how to run Prometheus in Docker, using a local configuration file and a bind mount for flexibility.
1. Create Your Configuration File
Begin by creating a Prometheus configuration file locally:
vi prometheus.ymlA minimal working example might look like this:
global:
  scrape_interval: 15s

scrape_configs:
  - job_name: 'prometheus'
    static_configs:
      - targets: ['localhost:9090']
Save it somewhere accessible, for example: ~/prometheus/prometheus.yml.
2. Run Prometheus in Docker
With the configuration file in place, start the container:
docker run -d \
  -p 9090:9090 \
  -v ~/prometheus/prometheus.yml:/etc/prometheus/prometheus.yml \
  prom/prometheus
Breakdown of Flags:
-p 9090:9090: Maps port 9090 from the container to your host. This is where Prometheus serves its web UI and API.-v ~/prometheus/prometheus.yml:/etc/prometheus/prometheus.yml: Mounts your local configuration file into the container. This is a bind mount, meaning any changes made locally will be reflected inside the container.
Note: You can also mount entire directories if you prefer to organise configuration or rule files separately.
3. Access the Prometheus Interface
Once the container is running, open your browser and navigate to:
http://localhost:9090You should see the Prometheus web interface up and running, reading from your local configuration file.
Final Thoughts
Whether you're setting up Prometheus (as I am), or any other service, this guide offers a structured, secure, and repeatable approach to managing services on Linux.
Using systemd provides long-term reliability, security, and native integration with the operating system. Meanwhile, Docker is a great option for prototyping, experimenting, or running services in isolated, portable environments without installing binaries directly onto your system.
Regardless of which route you choose, the core principles remain the same:
Use a dedicated system user to isolate privileges
Keep configuration and data in proper system-standard directories
Run as a managed service (either via systemd or a container) for consistency and control
Hopefully, this proves helpful to anyone deploying services in a clean, maintainable, and production-ready way. If you're adapting this guide for another tool or service, just swap out the names, paths, and commands as needed — the structure and reasoning still apply.